Deploying
To deploy and run a Microsoft Office solution you must grant full trust to the assembly in the security policy of each end user or cimputer.
How to Deploy your document level solution
There are several ways you can deploy your solution:
1) Deploying to a Shared Folder manually
2) Deploying to a Shared Folder using the Publish Wizard
3) Deploying to a SharePoint server
Deploying to a Shared Folder manually
You can manually deploy your solutions to a shared network
1) Copy the solution files from the build output folder to a shared folder on the network.
2) Open the solution file and change the deployment manifest manually.
(Office > Prepare > Properties)(Document Properties and click Advanced Properties)
On the Custom tab, select "_AssemblyLocation"
In the Value box there is a deployment manifest identifier. At the beginning of this identifier type the fully qualified path of the deployment manifest followed by a bar (path|identifier).
For example ( \\servername\foldername\filename.vsto|15554545-g754-45ff-dfd444554 )
Click OK and save the document.
Deploying to a Shared Folder using the Publish Wizard
Using the Publish Wizard to deploy your solution will do the following for your automatically:
1) Deploy the solution to a shared folder on the network.
2) Update the deployment manifest path inside the document.
Deploying to a SharePoint server
You can use SharePoint to deploy your document-level solutions to end users.
When users go to the SharePoint site and open a document, the runtime automatically starts to install the solution from a shared network folder.
The customisation will continue to work even if the document is copied elsewhere (for example the desktop)
1) Deploy the solution to a shared folder on the network (can it be on the sharepoint server ??)
2) Upload the document to a SharePoint document library and add the appropriate locations to the Microsoft Office trusted locations list in the Trust Center.
Deploying - Manual Copy
The quickest and simplest way to deploy your workbook is to copy it to a shared network drive. In this example we are going to use our C drive but the steps are the same for a shared network drive.
First Save and close Visual Studio we don't need this any more.
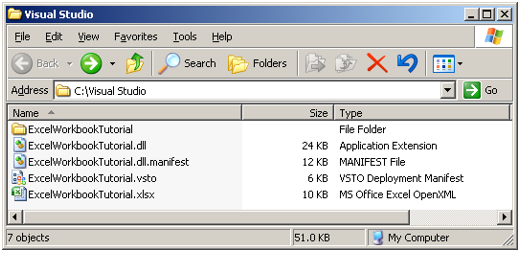
You will need to copy 4 files from the following folder.
C:\Visual Studio\ExcelWorkbookTutorial\ExcelWorkbookTutorial\bin\Debug \
ExcelWorkbookTutorial.xlsx
ExcelWorkbookTutorial.vsto
ExcelWorkbookTutorial.dll.manifest
ExcelWorkbookTutorial.dll
Paste these four files into the C:\Visual Studio\ folder:
 |
Double click on the ExcelWorkbookTutorial.xlsx file to open it.
You should see the message when the workbook is opened and then again when the workbook is closed.
Copying the files in this way will work if you want the workbook and all the code files in the same folder.
Deploying - Manual Copy Different Folder
If you want the code files saved in a different location to the workbook then we need to add the folder path to the _AssemblyLocation property.
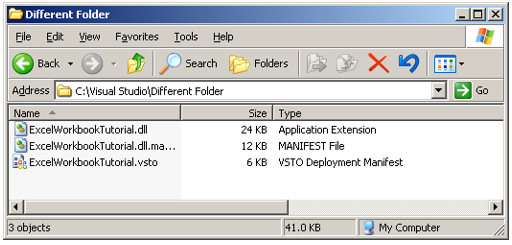
Lets start by moving our code files to a different folder, in this case it's a subfolder.
Create the following subfolder. C:\Visual Studio \Different Folder
Move the 3 code files into this subfolder
 |
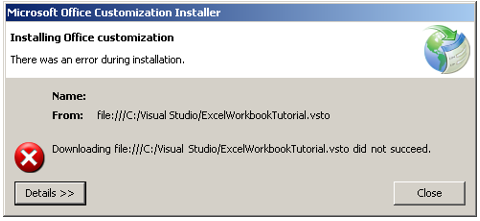
Go back to the C:\Visual Studio folder and now double click on the ExcelWorkbookTutorial.xlsx file to open it.
You will see the following message
 |
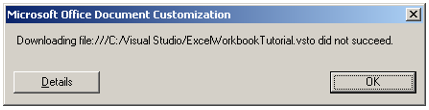
Press Close
You will then see the following message
 |
Select (File > Prepare > Properties)
Choose Document Properties drop-down in the top left and select Advanced Properties
Select the _AssemblyLocation custom property
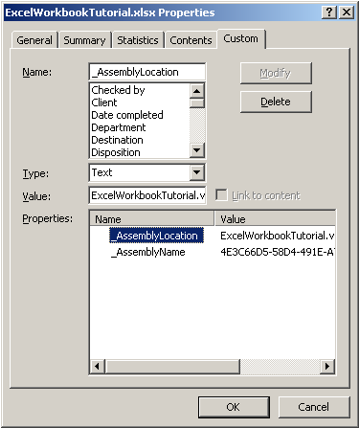 |
Change this value to the following and press Modify
_AssemblyLocation - C:\Visual Studio\Different Folder\ExcelWorkbookTutorial.vsto|db7898a4-4611-49e1-b0a0-5d90cfcf03d8|vstolocal
Save the workbook and close it
Reopen the workbook. You will see that the messages appear again.
Deploying - Publish
Instead of copying the files manually
Multiple Instances
The great advantage that a VSTO document-level solution has over a VBA solution is that you can have multiple workbooks all using and referring to the same code.
Lets create another workbook and lets link the code that we have to this workbook.
Reopen Excel and select New Blank Workbook
Save this workbook as C:\Temp\ MultipleInstances.xlsx
Select (File > Prepare > Properties)
Choose Document Properties drop-down in the top left and select Advanced Properties
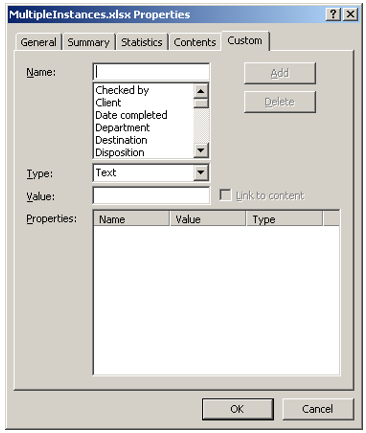 |
Create the following two custom document properties and save the corresponding values
_AssemblyName - (as Text) 4E3C66D5-58D4-491E-A7D4-64AF99AF6E8B
_AssemblyLocation - (as Text) C:\Visual Studio\Different Folder\ExcelWorkbookTutorial.vsto|db7898a4-4611-49e1-b0a0-5d90cfcf03d8|vstolocal
Save the workbook and close
Reopen the workbook. You will see that the messages appear again.
© 2024 Better Solutions Limited. All Rights Reserved. © 2024 Better Solutions Limited TopPrevNext