Cells & Ranges
It is possible to lock your cells to prevent people from changing the contents but you must protect the worksheet in order for the locked cells to work.
By default Excel locks (protects) all cells and charts but the protection is disabled until you choose (Tools > Protection > Protect Sheet).
There is a whole range of specific editorial actions to occur even on a protected sheet. You can also allow users to sort, use Auto Filter and Pivot table reports.
You can also allow password access to specific cell ranges (Tools > Protection > Allow users to Edit Ranges).
What will it Protect ?
It is possible to protect individual cells from being modified, resized, moved or deleted.
When you protect cells this is down via the (Format > Cells) (Protection Cells). By default, the cell protection attribute is set to Locked. If you protect a worksheet then every cell is protected. You must turn off the locked attribute on every cell that you want the user to be able to edit.
Protection of workbooks and worksheets can easily be hacked using simple VBA macros.
It is possible to force your users to Enable macros when they open a file. Basically have a message box that appears by default saying that nothing will run unless you enable the macros. If macros are enabled then do not display this dialog box.
Another possibility might be to include an expiry date. Although the draw back of this is that you can change the system clock on your computer. Alternatively allow them to open a file a fixed number of times.
UnProtecting Individual Cells
When you protect a worksheet all the cells are protected by default although it is possible to remove this protection.
Removing this protection from individual cells and ranges can be done using the (Format > Cells)(Protection tab).
You cannot change these properties once the worksheet has been protected.
You can change the protection for individual cells by highlighting the cells and selecting (Format > Cells)(Protection tab).
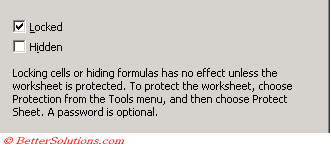 |
Locked - Remove if you want the cell(s) to be edited after the worksheet has been protected.
Hidden - Prevents any formulas in the cell(s) from being displayed in the Formula bar after the worksheet has been protected.
You can change the exact aspects of the cell protection by selecting (Tools > Protection > Protect Sheet)
Excel does not provide any on-screen indication that cells are protected so it is worth applying formatting to these specific cells.
If a locked cell is selected, pressing Tab will move (top to bottom and left to right) to the next locked cell. Pressing (Shift + Tab) will take you in the opposite direction.
Setting up Range protections
If you are using Excel 2002 or later you can specify which users are allowed to edit which cells.
Select (Tools > Protection > Allow Users to Edit Ranges).
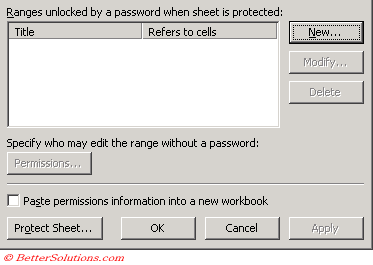 |
This dialog box displays the cell range titles and corresponding cells for which specific users, computers or groups have been designated for special access. The specified users, computers or groups may access the specified cells in the protected worksheet using an assigned password.
New - Creates a new range by displaying another dialog box. This lets you specify individual users, computers or groups that will have permission to edit a selected cell range using a password.
Modify - Allows you to modify the selected range.
Delete - Deletes the selected range.
Permissions - Allows you to designate individual users, computers or groups that may make changes to the specified cells without entering a password. The administrator may wish to grant this permission to himself or herself (specifying a range that includes all cells) in order to make changes without repeated protecting and unprotecting of the worksheet.
Paste permissions - Select to have a worksheet automatically created that summarizes the ranges, cells, and permissions specified in this dialog.
Protect Sheet - Displays the Protect sheet dialog box. Allows you to set a password for the protection of this worksheet and designate specific actions permissible for those users who do not have access to the password. Once you have assigned specific ranges you must protect the whole worksheet.
Apply - Saves all the changes you've made without closing the dialog box.
Important
When a user attempts to change the contents of a locked cell an error message is displayed.
By default all cells will be protected when a worksheet is protected.
When you use the "Hidden" checkbox, this should be used for formulas that you do not want displayed in the formula bar.
Changing the "locked" and "hidden" checkboxes has no effect unless the worksheet is protected.
© 2024 Better Solutions Limited. All Rights Reserved. © 2024 Better Solutions Limited TopPrevNext