Tutorial - react.dev
There is an excellent tutorial on the react.dev website to help you get started using React.
This page is our own translation of that tutorial.
The example on this page is an extension of the web application from the [[Linking React File]] page.
For an identical sample that uses TypeScript Interfaces you should read [[TypeScript > TSX and Webpack > react.dev Tutorial]].
This sample creates three React components (Square, Board and Game).
Square - This component renders a single <button>
Board - This component renders 9 Squares to create the grid
Game - This component renders the Board plus some interactive components
Lets start by modifying the following two files (index.html and index.jsx).
index.html
Replace the code in this file to include some CSS.
<!DOCTYPE html>
<html>
<head>
<style>
body {
  font: 14px "Century Gothic", Futura, sans-serif;
  margin: 20px;
}
ol, ul {
  padding-left: 30px;
}
.board-row:after {
  clear: both;
  content: "";
  display: table;
}
.status {
  margin-bottom: 10px;
}
.square {
  background: #fff;
  border: 1px solid #999;
  float: left;
  font-size: 24px;
  font-weight: bold;
  line-height: 34px;
  height: 34px;
  margin-right: -1px;
  margin-top: -1px;
  padding: 0;
  text-align: center;
  width: 34px;
}
.square:focus {
  outline: none;
}
.kbd-navigation .square:focus {
  background: #ddd;
}
.game {
  display: flex;
  flex-direction: row;
}
.game-info {
  margin-left: 20px;
}
</style>
</head>

<body>
   <h3>BetterSolutions.com</h3>
   <div id='app'></div>
   <script src="webpackbundle.js"></script>
</body>
</html>
index.jsx
Replace the code in this file to create three React components (or classes).
var React = require('react');
var ReactDOM = require('react-dom');

class Game extends React.Component {
  render() {
    return (
      <div className="game">
        <div className="game-board">
          <Board />
        </div>
        <div className="game-info">
          <div></div>
          <ol></ol>
        </div>
      </div>
    );
  }
}

class Board extends React.Component {
  renderSquare(i) {
    return <Square />;
  }
  render() {
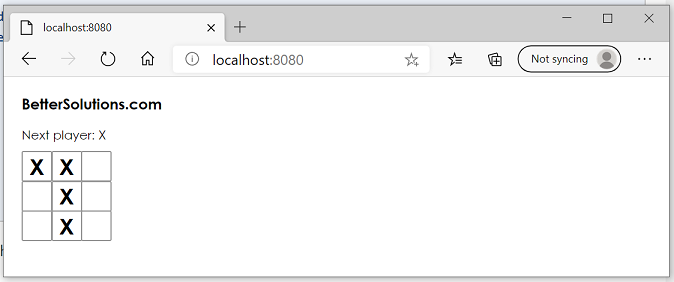
    const status = 'Next player: X';

    return (
      <div>
        <div className="status">{status}</div>
        <div className="board-row">
          {this.renderSquare(0)}
          {this.renderSquare(1)}
          {this.renderSquare(2)}
        </div>
        <div className="board-row">
          {this.renderSquare(3)}
          {this.renderSquare(4)}
          {this.renderSquare(5)}
        </div>
        <div className="board-row">
          {this.renderSquare(6)}
          {this.renderSquare(7)}
          {this.renderSquare(8)}
        </div>
      </div>
    );
  }
}

class Square extends React.Component {
  render() {
    return (
      <button className="square">
      </button>
    );
  }
}

ReactDOM.render(
  <Game />,
  document.getElementById('app')
);
Save the changes and check the web page has updated.
 |
Changes 1 - Passing Data
Let's pass some data from the Board component to the Square component.
Find the Square's render method.
Display a property called "value" on the button.
render() {
  return (
    <button className="square">
      { this.props.value }
    </button>
Find the Board's renderSquare method.
Add the property called "value" to the Square, assigning it the value of i.
renderSquare(i) {
  return <Square value={i} />
}
Save the changes and check the web page has updated.
 |
Changes 2 - Interactive Component
Let's display a prompt when you click on any square on the board.
Find the Square's render method.
Add an "onClick" event to the button, that displays an alert popup.
render() {
  return (
    <button
        className="square"
        onClick={ () => alert('click') }
    >
      { this.props.value }
    </button>
  )
}
Run the code and check the web page.
Check that you see a prompt when you click on any square on the board.
 |
Let's fill the Square component with an "X" when we click it.
Find the Square's class.
Add a constructor to the Square class (above the render method).
Initialise the state called "value" inside the constructor and initialise it with the value null.
class Square extends React.Component {
  constructor(props) {
    super(props)
    this.state = {
      value : null
    }
  }
Find the Square's render method.
Change the "onClick" event inside the Square's render method to set the state "value" to 'X' (instead of displaying the alert popup).
render() {
  return (
    <button
       className="square"
       onClick={ () => this.setState( { value : 'X' } ) }
    >
      { this.props.value }
    </button>
  )
}
Change the text that is displayed on the button inside the Square's render method to display the state "value" (instead of the property "value").
render() {
  return (
    <button
       className="square"
       onClick={ () => this.setState( { value : 'X' } ) }
    >
      { this.state.value }
    </button>
  )
}
Save the changes and check the web page has updated.
Check that when you click on a cell an X appears.
 |
Changes 3 - Lifting to Parent
Let's save the 9 square values into an array.
The value of each of the 9 squares needs to be stored at the Board level which is the Square's parent component.
Find the Board's class.
Add a constructor to the Board class (above the renderSquare method).
Add a state called "squares" inside this constructor and initialise it with an array of 9 null values.
class Board extends React.Component {
  constructor(props) {
    super(props)
    this.state = {
      squares : Array(9).fill(null)
    }
  }
Find the Board's renderSquare method.
Change the Square's "value" property to be the corresponding value from the "squares" array.
renderSquare(i) {
  return <Square value={ this.state.squares[i] } />
}
Save the changes and check the web page has updated.
Check that when you click on a cell an X still appears.
Changes 4 - Update Board State
Let's save the square values into the array.
When a Square is clicked we need to update the state of the Board.
We cannot update the Board's state directly from the Square.
Find the Board's class.
Add a method called "handleClick" to the Board's class (above the renderSquare method).
This method changes the corresponding value in the "squares" array and reassigns a new array to this state.
The slice method copies the array.
handleClick(i) {
  const squares2 = this.state.squares.slice();
  squares2[i] = 'X';
  this.setState( {
    squares : squares2
  } );
}
Find the Board's renderSquare method.
Change the return statement to use parentheses (so we can write it over multiple lines).
renderSquare(i) {
  return (
    <Square value={this.state.squares[i]} />
  )
}
Change the Square element to be over 3 lines.
Add a property called "OnClick" to the Square, assigning it to the HandleClick method.
renderSquare(i) {
  return (
    <Square
      value={ this.state.squares[i] }
      OnClick={ () => this.handleClick(i) }
    />
  )
}
Find the Square's render method.
Change the "onClick" event of the button to call the property "OnClick" (instead of setting the state "value").
render() {
  return (
    <button
       className="square"
       onClick={ () => this.props.OnClick() }
    >
      { this.state.value }
    </button>
  )
}
Change the text that is displayed on the button to display the property "value" (instead of the state "value").
render() {
  return (
    <button
       className="square"
       onClick={ () => this.props.OnClick() }
    >
      { this.props.value }
    </button>
  )
}
Find the Square's constructor method.
Remove the state "value" from the Square's constructor (because this state has been moved to a property).
Remove the Square's constructor method.
class Square extends React.Component {
  // constructor(props) { } - remove this whole method
  render() {
    return (
Save the changes and check the web page has updated.
Changes 5 - Taking Turns
Let's change the message at the top to indicate which player has the next turn.
When the squares are clicked the value needs to switch between 'X' and 'O'.
Find the Board's constructor.
Add a state called "xIsNext" inside the constructor and initialise it to true.
class Board extends React.Component {
  constructor(props) {
    super(props);
    this.state = {
      squares : Array(9).fill(null),
      xIsNext : true
    }
  }
Find the Board's handleClick method.
The slice method copies the array.
Change the corresponding value in the "squares2" array to read the state called "xIsNext" and toggle between 'X' and 'O'.
handleClick(i) {
  const squares2 = this.state.squares.slice();
  squares2[i] = this.state.xIsNext ? 'X' : 'O';
  this.setState( {
    squares : squares2
  } );
}
Inside the setState, toggle the value of the state called "xIsNext".
handleClick(i) {
  const squares2 = this.state.squares.slice();
  squares2[i] = this.state.xIsNext ? 'X' : 'O';
  this.setState( {
    squares : squares2,
    xIsNext : !this.state.xIsNext
  } );
}
Find the Board's render method.
Change the "status" constant inside the Board's render method to indicate which player has the next turn.
render() {
  const status = 'Next player: ' + (this.state.xIsNext ? 'X' : 'O');
}
Save the changes and check the web page has updated.
 |
Changes 6 - Finding the Winner
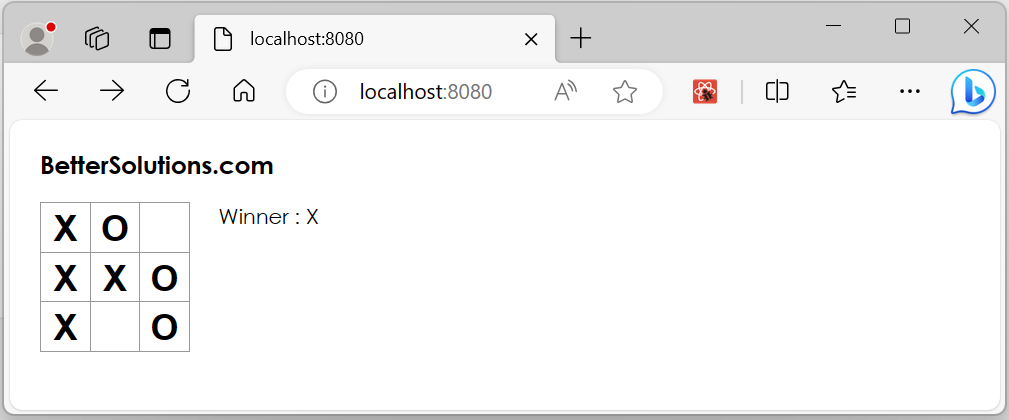
Let's identify when there is a winner and which player it is.
Add the following "helper" function at the end of the file below the Square class (above ReactDOM.render).
This will check for a winner and return 'X', 'O' or null as appropriate.
function calculateWinner(squares) {
  const lines = [
    [0, 1, 2],
    [3, 4, 5],
    [6, 7, 8],
    [0, 3, 6],
    [1, 4, 7],
    [2, 5, 8],
    [0, 4, 8],
    [2, 4, 6],
  ];
  for (let i = 0; i < lines.length; i++) {
    const [a, b, c] = lines[i];
    if (squares[a] && squares[a] === squares[b] && squares[a] === squares[c]) {
      return squares[a];
    }
  }
  return null;
}
Find the Board's render method.
Change the "status" constant inside the Board's render method.
Replace the "const status" line with these seven lines.
render() {
  const winner = calculateWinner(this.state.squares);
  let status;
  if (winner) {
    status = 'Winner : ' + winner;
  } else {
    status = 'Next player : ' + (this.state.xIsNext ? 'X' : 'O');
  }

  return (
}
Find the Board's handleClick method.
Change the method to return early if someone has won the game or if the square has already been clicked.
Replace the "const square2" line with these four lines.
handleClick(i) {
  const squares2 = this.state.squares.slice();
  if (calculateWinner(squares2) || squares2[i] ) {
    return;
  }

  squares2[i] = this.state.xIsNext ? 'X' : 'O';
}
Run the code and check the web page.
 |
Changes 7 - History of Moves
Let's keep a record of all the moves.
To do this we create an array called "history" and in this array we need to save a copy of the "squares" array after each turn.
The history array represents all the board states, from the first move to the last move.
We want the Game component to be able to access the history array.
For this we need to add a state called "history" to the Game class.
Using a state lets you save information inside a component.
Using a property lets you pass that information from the parent to the child.
Find the Game class.
Add a constructor to the Game class (above the render method).
This constructor defines the starting point for a new game.
Add a state called "history" inside this constructor and initialise it with an array of 9 null values.
Add a state called "xIsNext" inside the constructor and initialise it to true.
class Game extends React.Component {
  constructor(props) {
    super(props);
    this.state = {
      history : [{
        squares: Array(9).fill(null),
      }],
      xIsNext : true,
    };
  }
At the moment the Board class contains the "squares" state.
The "squares" array needs to be accessible from the Board.
To achieve this we lift the state to the parent and then pass it down as a property.
We can replace the Board's "squares" state with a property instead, which means this value can be passed down from the Game class to the Board class.
Find the Board's constructor.
Remove the state "squares" from the Board's constructor (because this will be passed down as a property).
Remove the state "xlsNext" from the Board's constructor (because this will be passed down as a property).
Remove the Board's constructor method.
class Board extends React.Component {
  // constructor(props) { } - remove this whole method
  renderSquare(i) {
    return (
Find the Board's renderSquare method.
Change the square's value property to be a value from the Board's "squares" property (instead of the state "squares").
Change the square's OnClick property to call the Board's "onClick" property (instead of the method)
renderSquare(i) {
  return (
    <Square
      value={ this.props.squares[i] }
      OnClick={ () => this.props.onClick(i) }
    />
  )
}
Move the seven lines of code below the Board's render method to below the Game's render method.
render() {
  const winner = calculateWinner(this.state.squares);
  let status;
  if (winner) {
    status = 'Winner : ' + winner;
  } else {
    status = 'Next player : ' + (this.state.xIsNext ? 'X' : 'O');
  }
Add a line of code to initialise a history array.
Add a line of code to initialise a current array.
Change the argument passed to the calculateWinner method to be "current.squares" (instead of "this.state.squares")
render() {
  const history = this.state.history;
  const current = history[history.length - 1];
  const winner = calculateWinner(current.squares);

  let status;
Find the Game's render method.
Add a property called "squares" to the Board.
Add a property called "onClick" to the Board that calls the "handleClick" method.
render() {
  return (
    <div className="game">
      <div className="game-board">
        <Board
           squares={ current.squares }
           onClick={(i) => this.handleClick(i)}
        />
Find the Board's render method.
The status of the game needs to be rendered from the Game class (and not the Board's class).
Remove the status from the Board's return method.
return (
  <div>
    <div className="board-row">
      {this.renderSquare(0)}
      {this.renderSquare(1)}
      {this.renderSquare(2)}
    </div>
Find the Game's render method.
Add the status to the Game's return method.
return (
  <div className="game">
    <div className="game-info">
      <div>{status}</div>
      <ol></ol>
    </div>
  </div>
Find the Board's handleClick method.
At the moment the Board's class contains a handleClick method.
Move the "handleClick" method from the Board's class to the Game's class (above the render method).
handleClick(i) {
  const squares2 = this.state.Squares.slice();
  if (calculateWinner(squares2) || squares2[i]) {
    return;
  }
  squares2[i] = this.state.xIsNext ? 'X' : 'O';
  this.setState({
    squares: squares2,
    xIsNext: !this.state.xIsNext
  });
}
Add a line of code to initialise a history array.
Add a line of code to initialise a current array.
Change the line of code that initialises the squares2 array.
Inside the setState, change the state called "squares" to a state called "history" and append the squares2.
The concat method does not mutate the original array.
handleClick(i) {
  const history = this.state.history;
  const current = history[history.length - 1];
  const squares2 = current.squares.slice();

  if (calculateWinner(squares2) || squares2[i]) {
    return;
  }
  squares2[i] = this.state.xIsNext ? 'X' : 'O';
  this.setState({
    history: history.concat([{
      squares: squares2,
    }]),
    xIsNext: !this.state.xIsNext,
  });
}
Run the code and check the web page.
 |
Changes 8 - Showing The Past Moves
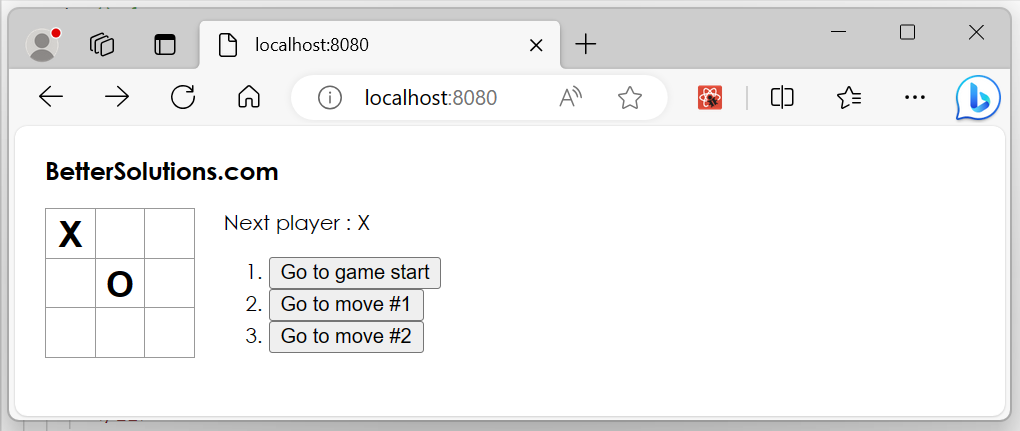
Now that we are storing a history of the moves we can display this to the user.
Using the JavaScript array's map method, we can map our history of moves to React elements.
We can display this as buttons on the screen, and display a list of buttons to allow the user to "jump" to past moves.
Find the Game's render method.
Add a variable called moves that can return a list item containing a button element.
render() {
  const history = this.state.history;
  const current = history[history.length - 1];
  const winner = calculateWinner(current.squares);

  const moves = history.map((step, move) => {
    const desc = move ?
      'Go to move #' + move :
      'Go to game start';
    return (
      <li>
        <button
          onClick={() => this.jumpTo(move)}>{desc}
        </button>
      </li>
    );
  });

  let status;
Add the moves to the Game's return method.
<div className="game-info">
  <div>{status}</div>
  <ol>{moves}</ol>
We need to specify a key property for each list item to differentiate each list item from its siblings.
"key" is a special and reserved property in React.
React automatically uses this key to decide which components to update.
It's strongly recommended that you assign proper keys whenever you build dynamic lists.
Keys do not need to be globally unique; they only need to be unique between components and their siblings.
Each past move has a unique ID associated with it: it's the sequential number of the move.
The moves are never re-ordered, deleted, or inserted in the middle, so it's safe to use the move index as the key.
In the Game component's render method, we can add the key as <li key={move}>
const moves = history.map((step, move) => {
  const desc = move ?
    'Go to move #' + move :
    'Go to game start';
    return (
      <li key={move}>
      <button
        onClick={() => this.jumpTo(move)}>{desc}
      </button>
      </li>
    );
Add stepNumber to the Game component's state to indicate which step we're currently viewing.
Find the Game's constructor.
class Game extends React.Component {
  constructor(props) {
    super(props);
    this.state = {
      history: [{
        squares: Array(9).fill(null),
      }],
      stepNumber: 0,
      xIsNext: true,
    };
  }
Add the jumpTo method to update the stepNumber (above the render method).
jumpTo(step) {
  this.setState({
    stepNumber: step,
    xIsNext: (step % 2) === 0,
  });
}
The stepNumber state we've added reflects the move displayed to the user now.
After we make a new move, we need to update stepNumber by adding stepNumber: history.length as part of the this.setState argument.
This ensures we don't get stuck showing the same move after a new one has been made.
Change the handleClick method.
Change the history constant.
Change the stepNumber to be initialised to history.length
handleClick(i) {
    const history = this.state.history.slice(0, this.state.stepNumber + 1);
    const current = history[history.length - 1];
    const squares2 = current.squares.slice();

    if (calculateWinner(squares2) || squares2[i]) {
      return;
    }
    squares2[i] = this.state.xIsNext ? 'X' : 'O';
    this.setState({
      history: history.concat([{
        squares: squares2
      }]),
      stepNumber: history.length,
      xIsNext: !this.state.xIsNext,
    });
  }
FInd the Game's render method
Change the current constant
render() {
  const history = this.state.history;
  const current = history[this.state.stepNumber];
  const winner = calculateWinner(current.squares);
 |
© 2024 Better Solutions Limited. All Rights Reserved. © 2024 Better Solutions Limited TopPrevNext