Worksheets
A worksheet is the name given to the large grid where you actually perform your calculations.
A worksheet can be thought of as a single sheet of paper.
Worksheets are where you store your data and you will typically have more than one worksheet in a workbook.
 |
Every worksheet has 16,384 columns (A - XFD) and 1,048,576 rows.
This means that every worksheet contains 16,777,216 individual cells. This cannot be changed.
The exact number of cells displayed at any one time depends on the size of the screen, screen resolution and video driver.
Each intersection of a row and a column defines a cell and this cell can be identified by its unique address.
Cell Address
A cell address is made up of the column letter followed by the row number.
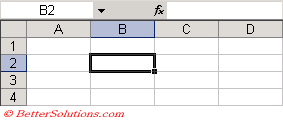
For example the cell that is the intersection of column "B" with row "2" has a unique cell address of "B2".
Every cell on a worksheet has a unique address.
The Name box in the top left corner always displays the address of the active cell.
 |
The following are all examples of cell addresses: A1, B2, D200, CC56, IV6000.
The active cell is the cell that is currently selected.
Using Worksheets
At any one time there can only ever be one Active Worksheet and one Active Cell.
To move between worksheets just select a different sheet tab at the bottom.
These are located at the bottom left of the workbook, next to the horizontal scroll bar.
 |
You can select a sheet tab to make that particular sheet active.
You can alternatively use the navigation arrow keys to the left of the sheet tabs.
There are four navigation arrows provided and they allow you to quickly move around between multiple worksheets.
| First - Selects the first worksheet in the active workbook. | |
| Left - Selects the worksheet to the left of the left of the active worksheet. | |
| Right - Selects the worksheet to the right of the active worksheet. | |
| Last - Selects the last worksheet in the active workbook. |
It is a lot simpler when using sheet names in formulas and range names if you do not use spaces in your worksheet names. Always use the underscore instead of a space.
Worksheet Zoom
You can enlarge and reduce the current font size of the worksheet by adjusting the view percentage.
You can magnify a worksheet to read small data or shrink a worksheet to view more of your data.
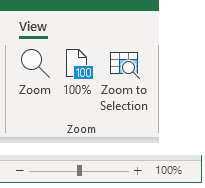
The quickest way to change the view percentage it to use the view drop-down list on the Standard toolbar.
To change the worksheet zoom percentage select a different percentage from the drop-down list.
The default percentage for all new worksheets is 100%.
 |
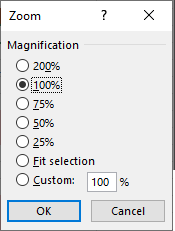
You can also change the Zoom percentage by displaying the Zoom dialog box.
Select (View > Zoom) and choose the required percentage from the available options.
You can zoom between 10 and 400%.
 |
To view the whole worksheet, press (Ctrl + End), Hold down Shift and select (Ctrl + Home).
To view just a particular range of cells, highlight the cells and choose Fit Selection from the Zoom dialog box.
You can Zoom only selected cells rather than the whole sheet if you use the Selection option with the Zoom. This option allows you to select the cells you want to zoom in on (this option won't reduce a range) and chooses just the right percentage to see the selection as large as possible.
When you're done, select 100% (or the appropriate percentage) from the Zoom control in the Toolbar or choose Edit, Undo Zoom or press Ctrl-Z.
It is also possible to adjust this zoom size by holding down the Ctrl key and moving your mouse wheel (only if you are using an IntelliMouse).
IntelliMouse
You can use the wheel that is located between your left and right mouse button to quickly move around a worksheet.
Turning the wheel towards you will scroll down the worksheet.
Turning the wheel away from you will scroll up the worksheet.
You can also press the wheel and drag the mouse to quickly move in a particular direction.
When the wheel is pressed the cursor will change into a grey direction arrow indicating the scrolling direction.
The scrolling speed depends on how fast you drag the mouse.
It is possible to change the wheel so instead of scrolling it zooms.
This can be done from changing your (Tools > Options)(General tab, "Zoom on Roll with Intellimouse").
Selecting Worksheets
If your workbook contains a lot of worksheets or your worksheet names are quite long, then the sheet tabs may not all be visible at the same time meaning selecting the sheet you want will involve scrolling.
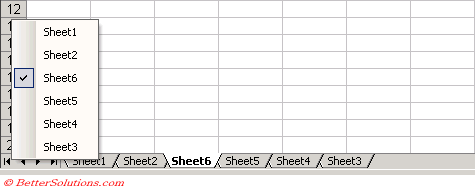
You can quickly display a list of all the worksheets in a workbook by clicking the right mouse button over any of the worksheet scroll bars.
 |
This list will only display the first 15 worksheets, if your workbook contains more then an additional "More Sheets" command will display the Activate dialog box allowing you to select the worksheet from a list box.
The quickest way to move to a particular sheet if you cannot see them all is to right click on any of the tab scrolling buttons to display a full list of the worksheets and then double click (or select) the one you want. This becomes even easier if the worksheets are in alphabetical order.
The worksheets are listed in the order in which they appear in your workbook and selecting one of them will select that worksheet.
Formatting Worksheets
You can display a graphic as your background to a worksheet. (Format > Sheet > Background). Choose the image you want to use.
To format several sheets in an identical manner select them all before applying any formatting. Anything you do on the active sheet happens on all the selected sheets.
Colouring the worksheet tabs offers you more organisation flexibility
When multiple worksheets are selected, any changes made to one worksheet will be made to all the worksheets that are selected.
3 Different Layers
An Excel spreadsheet actually consists of two layers - a value layer and a function layer.
The value layer is active by default so that the results of any formulas are displayed. You can select or toggle between the two layers either by changing it in (Tools > Options) (View tab) or by using the short cut key (Ctrl + ~) / (Ctrl + ').
Worksheets actually have three layers:
Values layer -
Formula layer -
Drawing layer - This is where you can add various objects (such as graphics, charts, AutoShapes, objects etc)
Important
It is very important to know the distinction between a sheet and a worksheet. A worksheet is a type of sheet. There are several other types, for example a chart sheet.
You can change the default number of worksheets that appear in a new workbook by selecting (Excel Options)(General tab, Sheets in new workbook).
There is no restriction on the number of worksheets you can add to a workbook.
The quickest way to copy an existing worksheet is to hold down the Ctrl key while you drag the sheet tab.
© 2026 Better Solutions Limited. All Rights Reserved. © 2026 Better Solutions Limited TopNext