Workbooks
Supplying passwords is always recommended if you want to prevent unauthorised access to your worksheet.
Once you have protected parts of your workbook you will not be able to change the items and a message box will be displayed telling you that the item is currently protected.
As well as being able to add password protection to a particular file you can also protect your workbook structure, individual cells, graphic objects, scenarios, windows as well an individual cells.
Be aware that once you have assigned a password to apply protection there is no way to remove the protection without the password, so try not to forget it.
Passwords are case-sensitive and can have up to 15 characters. Before you open a workbook that requires a password, make sure you have not pressed the Caps Lock key.
What can I Protect ?
You can decided which cells an and cannot be amended by the users.
You can also specify exactly which operations can be performed on these cells.
You can also prevent users from changing the workbook structure or from resizing the workbooks.
You can also allocate passwords to your workbooks in order to open them.
The protection of your workbooks is split on to several levels.
By default Excel will protect (or lock) all cells and charts when you protect a worksheet.
Prevent it from being opened and viewed.
The first protection level is when you "Save as". If you select the Options on the (File > Save As) dialog you can set passwords for read only and modify.
The always create a backup check box will save a copy of the previously saved file called "Backup of filename.xlk".
If a workbook is already shared and you want to protect it, you must remove the sharing feature before setting up the protection.
1) Make sure all users have saved and closed the shared workbook.
Unsharing the workbook also looses the change history. If you want to keep this information you could print out the History worksheet.
Use (Tools > Share Workbook > Editing)
Make sure that you are the only person listed in the "Who has this workbook open now" box.
Clear the "Allow changes by more than one user at the same time" checkbox
If this checkbox is unavailable then you must unprotect the workbook first.
(Tools > Share Workbook > Editing).
For more details, please refer to the Shared Workbooks
What will it Protect ?
By default all cells will be protected when a worksheet is protected.
It is possible to allow certain cells not to be locked by using the (Format > Cells)(Protection tab) Locked checkbox.
You can prevent a user from changing the structure of a workbook and to lock in the position of the workbook window itself.
Protecting a workbook not only will protect all the worksheets within it but will also prevent any changes to the way the workbook window is displayed.
If you are working with sensitive data it is possible to include an even greater level of security to passwords.
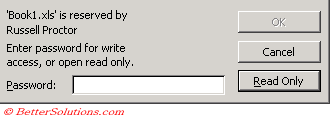
In addition to assigning a general password which is needed to open the workbook you can also assign a different password that is needed to actually modify the workbook.
Protecting a workbook
You can protect an individual worksheet by selecting (Tools > Protection > Protect Workbook).
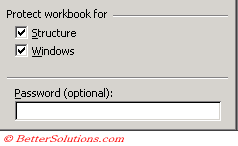 |
Structure - This prevents any worksheets from being added, renamed, deleted, copied, inserted or displayed.
Windows - This prevents any windows from being resized, unhidden, moved or closed. The control menu in the top right corner will actually disappear.
Opening a Protected Workbook
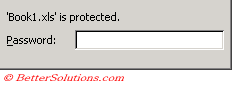 |
If the Workbook you are opening had a "Password to Modify" allocated to it you will be prompted by a further dialog box.
 |
Passwords are case sensitive. You must type uppercase and lowercase letters exactly as they were entered when the password was created. Before you open a workbook that requires a password, make sure you have not pressed the CAPS LOCK key.
Any commands that are unavailable due to the workbook being protected are disabled (i.e. greyed out).
UnProtecting a Workbook
To remove protection select (Tools > Protection > Unprotect Workbook). If prompted, enter the password. (If you are prompted for a password and you do not know the password, you cannot remove protection.)
Applying Passwords
If the content of your workbook is confidential then you can add a password to stop other people from opening and/or editing the workbook.
This security measure is in addition to any security provided by your network or operating system or by the Excel Protection feature ?
To access the save options select (Tools > Options)(Security tab)
You can encrypt the file by clicking the Advanced button in the Save Options dialog box. ??
By selecting RC4-based encryption you can create passwords up to 255 characters in length.
This provides very secure workbooks.
When you encrypt using RC4 users of Excel 2000 and older will not be able to open the file.
They will be prompted for a password but this does not work. It will always display "Password not Valid" error message.
SS Encryption type dialog box.
Important
To protect a workbook without protecting the windows, point to Protection on the Tools menu, click Protect Workbook, and then clear the Windows check box.
Passwords are case-sensitive and can have up to 15 characters. Before you open a workbook that requires a password, make sure you have not pressed the CAPS LOCK key.
If you hide a worksheet and then protect the workbook, the (Format > Sheet > Unhide) command will be disabled.
© 2026 Better Solutions Limited. All Rights Reserved. © 2026 Better Solutions Limited TopPrevNext