Worksheets
If a worksheet has any part of it protected then you cannot (may not be able) to select all the cells and perform a paste special as values.
All cells will be protected when you protect a worksheet. You must unlock the cells using (Format > Cells)(Protection tab) and clear the "locked" check box.
If you protect a worksheet without specifically unlocking any individual cells then every cell will be protected.
It is more than likely that you may want to protect certain formulas and formatting but leave other cells available for data to be entered. Before you protect the worksheet you must change the protection properties of those individual cells using (Format > Cells)(Protection tab).
If you have any hidden worksheets then these can be protected by protecting the workbook. Protecting a workbook will disable the (Format > Sheet > Unhides) command.
Protecting a Worksheet
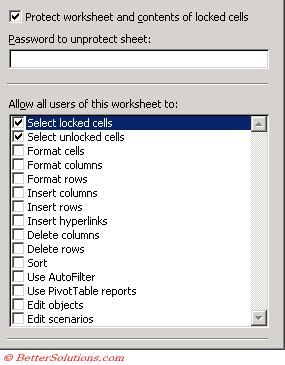
You can protect an individual worksheet by selecting (Tools > Protection > Protect Sheet).
If you do not supply a password then anyone can unprotect the worksheet.
 |
Protect worksheet and contents of locked cells - This must be checked.
All the following options will apply to all users of the worksheet.
Select locked cells - Allows all the users to select the cells which are protected. These are cells where the "Locked Property" has been ticked. By default users can select locked cells.
Select unlocked cells - Allows all the users to select the cells which are not protected. By default users can select unlocked cells and move between them using the Tab key.
Format cells - Allows all the users to format the cells to any desired format. When ticked no changes to cell formatting or conditional formatting can be made..
Format columns - Allows all the users to format the columns to any desired format. When ticked no changes to width or visibility can be made.
Format rows - Allows all the users to format the rows to any desired format. When ticked no changes to height or visibility can be made.
Insert columns - Allows all the users to insert additional columns.
Insert rows - Allows all the users to insert additional rows.
Insert hyperlinks - Allows all the users to insert hyperlinks to other workbooks and internet addresses.
Delete columns - Allows all the users to delete any columns that do not contain locked cells. When ticked but Insert columns is not ticked, users can insert columns which they cannot delete.
Delete rows - Allows all the users to delete any rows that do not contain locked cells. When ticked but Insert rows is not ticked, users can insert rows which they cannot delete.
Sort - Allows all the users to sort any data on this worksheet. When ticked no changes to sorting or filtering can be made.
Use AutoFilter - Allows all the users to use AutoFilter as a way to hide unwanted rows. When ticked you cannot change the drop-down menus. You cannot change apply or removed autofilters on a protected worksheet regardless of this setting.
Use PivotTable reports - Allows all the users to use Pivot tables on the data. When ticked no changes to layout, refreshing of reports can be made.
Edit objects - Allows all the users to edit any objects including charts. When ticked no changes to the following objects can be made: maps, embedded charts, shapes, text boxes, and controls that you did not unlock before you protected the worksheet. If you have added a button to run a macro, you can press the button but not delete the button. No changes to chart formatting can be made. Adding or viewing comments cannot be done.
Edit scenarios - Allows all the users to use and edit the scenarios. When ticked you cannot view scenarios that have been hidden, make changes to existing scenarios or delete scenarios. Users can change the values in cells if the cells are not protected. Users can also add new scenarios.
Unprotecting a Worksheet
You can unprotect an individual worksheet by selecting (Tools > Protection > UnProtect Sheet).
Type in the relevant password if required.
Important
If you have created a template and you want users to be able to tab between the cells that require data, you can unlock all the corresponding cells, before locking the worksheet.
By default all cells will be locked when a worksheet is protected.
If the sheet is protected you can hide the formulas from being displayed and displayed in the formula bar.
You can easily hide any worksheets and then protect the Workbook including "Structure". Hide your sheets then press (Tools > Protection > Protect Workbook).
Before you protect a worksheet you need to remove the lock from any cells you want users to be able to change.
You can quickly move between unprotected cells on a locked worksheet by using the Tab key.
© 2026 Better Solutions Limited. All Rights Reserved. © 2026 Better Solutions Limited TopPrevNext