Page Break Preview
Print Area
The Print Area is the area or range of cells that will be printed.
A page break defines where one page ends and another one begins.
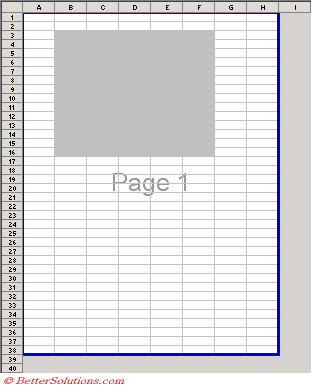
You can see the range of cells that will be printed by selecting (View > Page Break Preview).
This lets you see the print area clearly with all the page breaks identified.
The White area denotes the area that will be printed.
 |
Defining a Print Area lets you restrict the cell range that is printed.
When you have finished you can select (View > Normal).
Page Breaks in Normal View
Excel will insert page breaks for you automatically. To view these automatic page breaks select (Tools > Options)(View tab, Page Breaks).
Using Page Break Preview
It is possible to make other worksheet changes while working in this view, such as changing content, increasing column widths, removing rows etc.
It is just an alternative way to look at your worksheet.
You can adjust the page breaks in several ways.
You can drag the blue page breaks with your mouse to customise the printable area.
It is possible to also drag the print boundaries to include more or fewer columns or rows in your print area.
Solid lines vs Dotted Lines
Dotted lines show where automatic breaks will occur
If they are moved they are displayed as solid lines (because they then become manual breaks)
The solid lines are breaks that you have manually inserted.
The dashed lines are the default breaks that Excel inserts automatically.
The page names are displayed in grey.
Defining the Print Area
To only print part of a worksheet highlight the cells you want to print and select (File > Print Area > Set Area).
This will create a named range "Print_Area" automatically that will be used when printing.
If you change the "Print What" option buttons to Active sheet(s) then Excel will automatically check if you have a named range called "Print_Area" defined on those worksheets. If you have then this range of cells is printed. If not then the entire worksheet is printed.
The select (File > Print) and make sure the "Selection" is checked in the Print What options.
Removing the Print Area
You can remove a print area by selecting (File > Print Area > Clear Print Area).
To insert a manual page break, select the row or column you want to appear at the beginning of the new page and select (Insert > Page Break).
Any manual page breaks that you insert will over-write any that Excel placed fro you automatically.
Manual page breaks appear as bold dashed lines on the screen. These are darker than automatic page breaks
2 screen shots
Adding and Removing Page Breaks
It is possible to insert both Horizontal as well as Vertical page breaks.
To add a Horizontal page break, select the row below the row you want as the last row on the page
To remove a horizontal page break move the mouse over a cell directly below the page break line and select (Insert > Remove Page Break)
To remove a vertical page break move the mouse over a cell in the column directly to the right of the page break line and select (Insert > Remove Page Break).
To remove all the page breaks, select the whole worksheet and select (Insert > Remove Page Break).
To remove a page break. Select the row directly below or the column directly to the right of the page break.
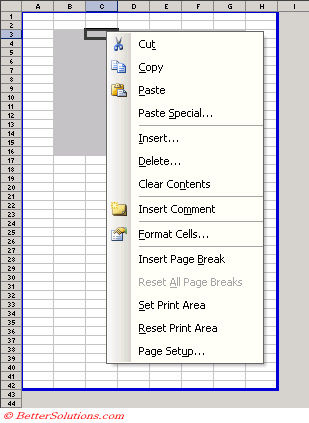
There is also some additional commands on the Cell shortcut menu when you are in Page Break Preview.
 |
Insert Page Break - Inserts a manual page break above the selected row to the left of the selected column.
Remove Page Break - Only appears when you select a cell (or range) that is below or to the left of a page break (excluding the outside border).
Reset All Page Breaks - Removes any manual page breaks.
Set Print Area - Same as (File > Print Area > Set Print Area)
Reset Print Area - Same as (File > Print Area > Clear Print Area)
Page Setup -
Manual Page Breaks
Any manual page breaks stay fixed when you make changes to the Page Setup, Page tab, Adjust to %
Changes to fit to - temporarily removes any manual page breaks (although switching back to "Adjust to" brings them back again).
Unless you are using "Fit to" you should consciously remove all the manual page breaks.
Automatic Page Breaks
An automatic page break is displayed as a dashed line with short dashes.
Manual page breaks remain active until you remove the,
To define a manual page break select (Insert > Page Break) - indicates by a dashed line ??
The Remove Page Break option only appears on the Insert menu when the cell pointer is in exactly the right place
where???
Important
You should try and create named ranges called "Print_Area" on all the worksheets you are going to print regularly. Using the (File > Print Area > Set Print Area) will create the named range for you.
Page breaks are inserted above the row you select and to the left of the column you select.
In Excel 2002 and 2003, any blank cells at the bottom and to the right edge of the print area are removed automatically.
It is possible to define a print area to be made up of discontinuous cell ranges. You can hold down the Ctrl key to select different groups of cells before setting the print area.
When does the "Welcome to page break preview" dialog box appear ?
To define the page setup on multiple worksheets, group them first.
© 2026 Better Solutions Limited. All Rights Reserved. © 2026 Better Solutions Limited TopPrevNext