Print Preview
Print Preview displays your page exactly as it will be printed and is only displayed in colour in you have a colour printer.
The worksheet name and page number will appear by default, although it is very easy to change the header and footer ??
You can display Print Preview either by pressing the button on the standard toolbar or by selecting (File > Print Preview). You should always preview you print,
 |
It is not possible to view more than one page at a time (unlike Word).
You can exit Print Preview mode at any time by pressing the ESC key.
The majority of the available options can be accessed from the Print Preview toolbar.
You can magnify an area of the page by moving the left mouse button over the page and pressing with the left mouse button. You can display the whole page again by pressing again.
The status bar in the bottom left corner tells you which page you are currently looking at and the total number of pages on your worksheet.
 |
Understanding the Print Preview toolbar
 |
Next - Moves to the next page if your worksheet has multiple pages. If you have multiple worksheets selected and click Next when the last page of a selected worksheet appears, Excel displays the first page of the next selected worksheet.
Previous - Moves to the previous page if your worksheet has multiple pages. If you have multiple worksheets selected and click Previous when the first page of a selected worksheet appears, Excel displays the last page of the previous selected worksheet.
Zoom - You can use the Zoom option to magnify and examine any particular part of the page. It is possible to zoom in by pressing the left mouse button anywhere on the page. There is no way to adjust the percent of the zoom though.
Print - Displays the (File > Print) dialog box.
Setup - Displays the (File > Page Setup) dialog box.
Margins - Displays the current margins on the page. Displays or hides margin handles that you can drag to adjust page margins, header and footer margins, and column widths.
Page Break preview - Displays the worksheet in Page Break preview. The same as selecting (View > Page Break Preview).
Close - Closes the print preview window and returns to the previous view of the active worksheet.
Help - Displays the Print Preview commands from the Help menu.
Adjusting the Margins
As you move a margin the distance is displayed in the bottom left corner between the margin and the edge of the page.
To adjust one of the margins move the mouse over one of the margin lines, hold down the left mouse button and drag the margin to its new location.
You can also change the widths of the columns. To change the width move the mouse over the column, the cursor will change to a ???. Press and hold down the left mouse button as you drag the column to a new width.
 |
You can reposition any of the margins by dragging them with the mouse. Note there is a margin indicator in the bottom left corner to give you the exact size.
 |
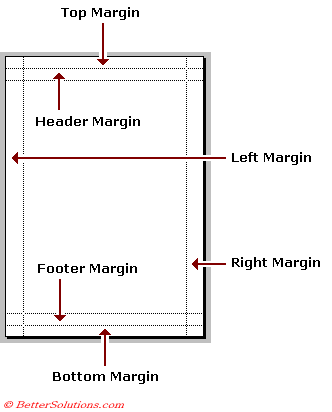
There are six types of margin that can be adjusted
 |
Important
To magnify an area of the page, move the mouse over the area (the cursor should change to a magnifying glass) and press the left mouse button. To return to normal view press the left mouse button again.
You can also define a group of non continous cells as your print area by using the Ctrl key and then selecting (File > Print Area > Set Print Area).
Margins are only visible when you display your worksheet in Print Preview.
The exact layout of your Print Preview window is determined by the Printer Driver.
Excel will include a small header and footer by default although this can easily be removed.
© 2026 Better Solutions Limited. All Rights Reserved. © 2026 Better Solutions Limited TopPrevNext