Create From Selection
This will create "workbook level" named ranges by default
If there is already a workbook level named range with that exact name then a "worksheet level" named range will be created.
Creating your Named Ranges automatically
You can quickly create named ranges for individual cells or ranges of cells using the (Insert > Name > Create) dialog box.
This can be used to create named ranges for an adjacent cell or a range of cells.
Your names should not start with a numerical value and you should try to avoid using spaces if you can.
Any spaces in your column or row labels will be automatically replaced with an underscore character.
If your column or row labels begin with a numerical value then they will be automatically prefixed with an underscore.
The named ranges are based on the row and column titles on your worksheet.
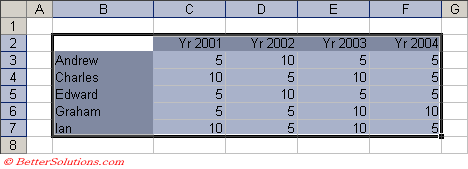 |
You should remember that whatever text is taken from the named ranges, these cells will not be included in the actual named ranges.
Using the (Insert > Name > Create) dialog box
You can let Excel create your named ranges automatically by selecting the table of data and selecting (Insert > Name > Create).
An alternative way to display this dialog box is to use the shortcut key (Ctrl + Shift + F3).
Select the table of data, in this case cell range "B2:F7".
Excel will analyse your data and insert check marks where it thinks you have labels. If it finds text in the top row of the selection then the top row check box will be checked.
You can obviously change the check marks if they are not correct.
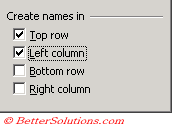 |
Top Row - Your table contains column labels in the top row of the table
Left Column - Your table contains row labels in the first row of the table
Bottom Row -Your table contains column labels in the bottom row of the table
Right Column -Your table contains row labels in the last column of the table
Displaying the Named Ranges
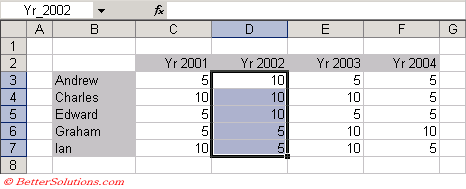
It is possible to use the (Insert > Name > Define) dialog box to display the named ranges although it is often quicker to use the Name Box to the left of the formula bar
Check that all the named ranges have been created successfully.
Remember that is any of the column or row labels contain spaces then these are automatically replaced with the underscore character.
 |
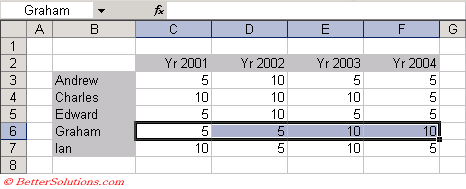
By highlighting one of the rows in the table you should see the corresponding named range appear in the Name Box.
 |
Using Named Ranges in Formulas
When you are using column and row labels it is very easy to reference individual cells within the table using the intersection of the named ranges.
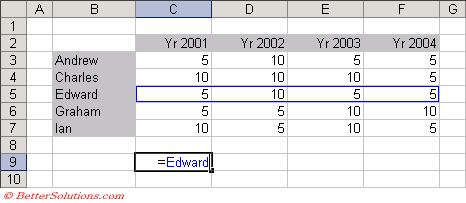 |
The advantage of using row labels means that you can reference different cells by using the same formula.
By typing "=Edward" into cell "C9", you are actually referencing cell "C5" as this is the intersection of the row with "Edward" as a row label and the column of the active cell.
Likewise by typing "=Edward" into cell "F9", you are referencing cell "F5".
Exactly the same is true for the columns.
 |
By typing "Yr_2003" into cell "H4" you are actually referencing cell "E4" as this is the intersection of the column with "Yr_2003" as its column label and the row of the active cell.
Likewise by typing "=Yr_2004" into cell "H7", you are referencing cell "F7".
You can also use a named range to enter a formula directly. The formula that you enter uses the active cell references "relative" to the active cell (i.e. the cell that receives the formula).
Known Problems
This approach only works when you have got unique column and row labels.
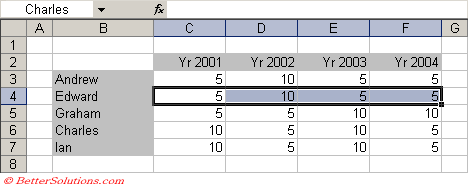
Using these named ranges does not work if the table is sorted by a different column.
In this example the table has now been sorted by the "Yr 2001" column.
Notice that the named range "Charles" still refers to the 2nd row in the table.
 |
Important
It is possible to refer to any cell in the table from anywhere on the worksheet by using the intersection of a row and a column label. By typing "=Yr_2002 Ian" you can reference the cell "D7" from anywhere on the worksheet.
You should always check the names after they have been created.
If Excel encounters any formulas in the cells used to create the named range, these are ignored and the corresponding named range is not created.
If your cells include text that includes spaces then they will be automatically replaced with an underscore.
You can use the shortcut key (Ctrl + Shift + F3) to displays the <b>(Insert > Name > Create) dialog box.
If the upper-left cell of a table contains text and you have chosen the top row and left column check boxes, Excel will define the entire range of cells, excluding the top row and first column with that Name.
© 2026 Better Solutions Limited. All Rights Reserved. © 2026 Better Solutions Limited TopPrevNext