Scenario Manager
It is possible to construct various scenarios with your data to allow you to perform "what if" analysis.
Being able to save different scenarios will help you to decide on the best values for your calculations.
You can also create scenarios that involve changing the values in multiple cells.
Viewing individual scenarios allows you to quickly see the impact of increasing or decreasing values in your calculations.
Adding scenarios to a workbook will change the underlying data so it is worth saving a backup of your original workbook first.
A Scenario is a named set of input values you can substitute in a worksheet model.
Allowing others to try different scenarios without losing your original saved scenario.
You can apply any scenario at any time and the corresponding cells will change to the necessary values.
Scenarios are useful for creating best and worst case forecasts
You can also use Solver results to create scenarios
When you apply a scenario, the new input values replace the values in input cells and formulas are automatically recalculated.
Scenarios can be used to test the result of a calculation given a set of variable input values.
Creating a new Scenario
You can display the Scenario Manager dialog box by selecting (Tools > Scenarios).
This dialog box will be empty initially so to add a new scenario press the Add button.
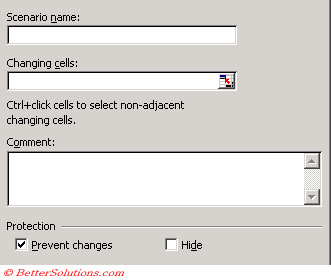 |
Scenario Name -
Changing Cells - The cells which you want to see predicted changes. You can specify multiple cells by separating them with a comma.
Comment - Allows you to add a description of the type of scenario.
Prevent Changes - Prevents users from modifying the scenario at a later date. This will only take affect when the worksheet is protected.
Hide - Prevents users from being able to see the scenario when the workbook is open. This will only take affect when the worksheet is protected.
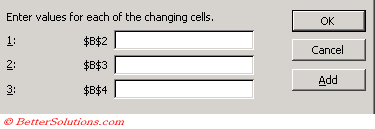
When you select OK the Scenario Values dialog box will appear letting you assign new values to the cells in the "Changing Cells" box. These are the values that will be used when this particular scenario is selected.
 |
Comparing the Results
It is possible to compare the results of all the Scenarios by creating a simple summary report.
This can be done by selecting the Summary button on the Scenario Manager dialog box.
 |
This will display the Scenario Summary dialog box giving you a choice of two types of summary.
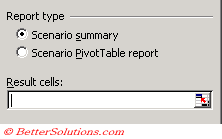 |
Scenario summary - This creates a normal table which is very useful when the same cells are used in the different scenarios.
Scenario Pivot table report - This creates a pivot table report which is very useful when different cells are used in different scenarios
You can also merge scenarios so that you can access and apply them from other worksheets to your current worksheet.
You can create several different scenarios that can then be easily compared.
You can construct scnearios that change multiple cells.
Constructing scenarios will change the value on your worksheet so it is worth creating a scenario to contain your original data.
1) First you specify the cells you want to see changes in
You can specify multiple cells by separating them with commas
2) Next you assign new values to each of the relevant cells
These values will be used when you select this particular scenario.
These options only work when the worksheet is protected
Prevent Changes - can be used to prevent users from modifying the scenario
Hide - Users can no longer view this scenario
Comparing Scenarios
If you want to compare the results of all the scenarios at once you can create a summary report by clicking on the summary button
SS
The scenario summary lets you create a table that compares the indidivudal scenarios
The scenrio pivot table option creates a Pivot Table report which is highly recommended when different cells are involved in the scenario calculation.
Important
Adding scenarios to a workbook will change the underlying data so it is worth saving a backup of your original workbook first.
You can revert back to the data values which preceded a scenario by pressing (Ctrl + Z) immediately after viewing the values.
© 2026 Better Solutions Limited. All Rights Reserved. © 2026 Better Solutions Limited TopPrevNext