Data Entry
You can add information to a list of data by moving to the next blank row below the list and typing the new information.
Alternatively you can use a built-in dialog box called the Data Form to enter this information.
Using a dialog box to enter and maintain the information can make it much quicker and is often easier for people who are less familiar with Excel.
The dialog box allows you to enter new records, delete records and search for specific records that meet a certain criteria.
This dialog box works as a multipurpose form allowing you to enter, search and view records in a list.
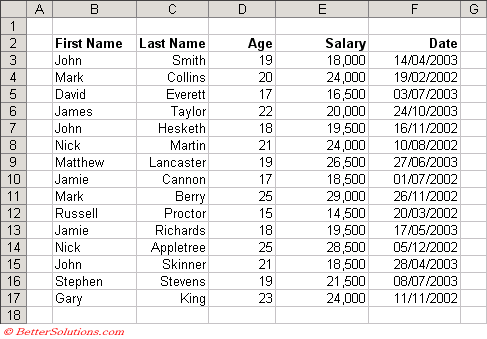
To be able to use the Data Form you must have a list of data arranged in a table like structure.
 |
Using the Data Form dialog box
Select File > Options > Customise Ribbon
Change the "choose command from" to All Commands
Scroll down and add "Form .." to your Quick Access Toolbar.
Press this command to display the Dialog Box.
If the row below this data is not blank, then any new information cannot be added.
You can use this dialog box to enter and edit the information in a database list.
To display this dialog box select any cell within the table and select Form from the Quick Access Toolbar.
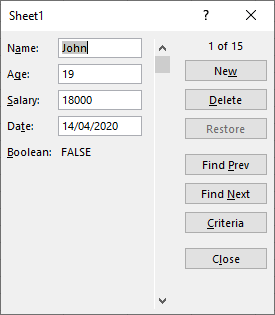 |
New - Clears the dialog box allowing you to enter a new record which is added to the bottom of your table.
Delete - Removed the current record from the table.
Find Next - Moves to the next record in the table.
Find Previous - Moves to the previous record in the table.
Criteria - Clears the dialog box entries and allows you to type in your search criteria.
Close - Closes the dialog box.
At the top of the form is the name of the active worksheet (not the workbook).
All the column headings from your table are listed on the left hand side.
This dialog box will display a maximum of 32 fields.
You can use the Tab, Shift + Tab, the underlined hotkeys, or the mouse to move between the different fields.
The dialog box also displays the total number of records and the scrollbar allows you to scroll the list record by record or many records at a time.
This form always shows the data from the first row when the dialog box is initially displayed, regardless of the active cell.
Any cells that contain formulas are displayed as values and not as editable text boxes.
Adding new data
You can select the New button to add a new row of data to your list.
Notice that the label in the top right corner will change to display "New Record"
An empty form is displayed.
When you add rows to your list the list is expanded downwards without affecting any cells outside the list.
Once you have finished press Enter or you can press "New" again to enter a another new record.
Searching for data
You can use the Criteria button to locate individual records within your list.
A new dialog box will be displayed - looking very similar to the main one.
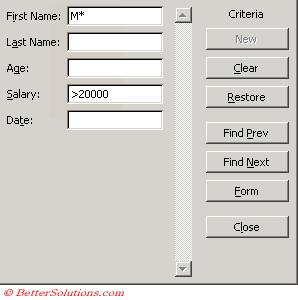 |
This includes edit boxes for all fields and allows to type in conditions allowing you to search the various columns.
If you enter criteria into more than one edit box then only rows that match all criteria will be displayed when you use Find Prev and Find Next.
When you click Find Next or Find Prev Excel takes you to the next (or previous) record that satisfies all the conditions.
When entering any text criteria, be aware that an asterisk wildcard character will be automatically appended to your text entry. So entering the letter "B" will find everything that begins with a "B".
A is lower than B
When you are entering data criteria you can use any valid date format.
Typing the first few characters will work only for non-numeric data. To search for dates, salaries etc you must enter the whole number or whole date.
Sorting your table of data first will speed up searching for records once your table reaches a certain size.
Excel ignores uppercase and lowercase when searching a database table.
Using Filters is more effective than using the search criteria although if the list is very long and the criteria is very specific then the data form is a good choice.
Shortcut Keys
| Down Arrow | Move to the same field in the next record |
| Up Arrow | Move to the same field in the previous record |
| Tab | Move to the next field you can edit in the record |
| Shift + Tab | Move to the previous field you can edit in the record |
| Enter | Move to the first field in the next record |
| Shift + Enter | Move to the first field in the previous record |
| Page Down | Move to the same field 10 records forward |
| Ctrl + Page Down | Move to a new record |
| Page Up | Move to the same field 10 records back |
| Ctrl + Page Up | Move to the first record |
| Home | Move to the beginning of a field |
| End | Move to the end of a field |
| Shift + Home | Extend the selection to the beginning of the field |
| Shift + End | Extend the selection to the end of the field |
| Left Arrow | Moves one character left in a field |
| Right Arrow | Moves one character right in a field |
| Shift + Left Arrow | Select the character to the left within a field |
| Shift + Right Arrow | Select the character to the right within a field |
Important
Pressing the Enter key at any time while you are entering your data will cause the record to be added. This can be annoying and will mean you will have to scroll up to then complete the record.
The Data Form does not have a quick way to allow you to enter auto-repeating information into any of the fields.
If inserting new data is going to overwrite any existing data, then the new data will not be accepted. Always make sure you have plenty of blank rows below the table if you are going to be entering a lot of information.
The (Data Form) dialog box when activated from VBA any dates or number are displayed in US format, although they are entered according to your Windows control panel setting. Be careful as you could invalidate your dates accidentally.
Is there a restriction on the number of records 16,383 ??
© 2026 Better Solutions Limited. All Rights Reserved. © 2026 Better Solutions Limited TopPrevNext