Saving
It is good practice to save your work frequently especially when you have just made substantial changes.
Alternatively you can use the button on the Standard toolbar.
 | Save - Saves the active workbook. |
When you save a workbook for the first time the (File > Save As) dialog box will be displayed.
There is also an AutoRecovery feature that can automatically save a workbook recovery file on a periodic basis.
AutoRecovery should not be used as an alternative to saving your workbook using (File > Save) but just as an extra safe guard.
What filenames can I use ?
Excel file names can be as long as 218 characters although it is not recommended to have file names longer than about 40 characters.
They can include any combination of alphanumeric characters, spaces and special characters with a few exceptions.
The following characters cannot be used : < > ? [ ] : * \ / | . , ; ] "
You can also use a combination of upper and lowercase letters.
You should try and make your filename descriptive so you and others can easily identify them.
Saving your Workbooks
There may be times when you want to save different versions of the same workbook.
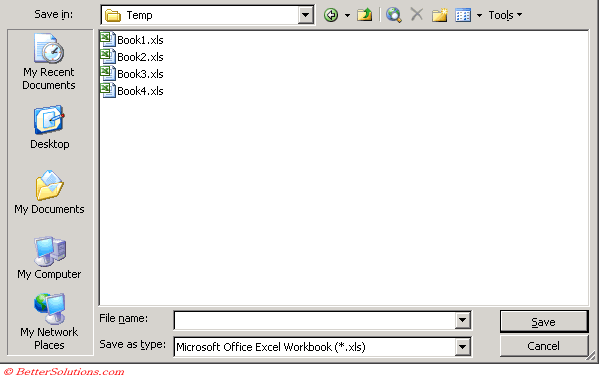
You can save a workbook with a different name using the (File > Save As) dialog box or the shortcut key (Alt + F2).
Select the folder you want to store the workbook in using the Save in drop-down list.
Enter the new filename in the File name text box at the bottom. You do not need to include the ".xls" file extension in this dialog box.
 |
A copy of your workbook will now be saved and this copy is displayed. Your original workbook is no longer displayed.
You can share files with users of older versions of Microsoft Excel by using the Save As command on the File menu to save the file as the correct file type.
You can save all the open workbooks as a workspace to be opened another time.
You can save duplicate copies of your workbooks in the same directory as your originals (File > Save As)(Tools, General Options)
An Excel workbook file is specific to the version of Excel that is was created in. Excel can read workbooks that were created in an earlier version but cannot open Excel files that were created in a later version.
Using AutoRecovery
Excel has a built-in AutoRecovery feature that can automatically save your workbooks on a periodic basis.
This feature is turned on by default and is set to save every 10 minutes.
This should not be used as an alternative to saving your workbooks using (File > Save) but just as an extra safe guard.
Can you change the frequency of the saves ??
 |
Although this feature is very useful in preventing lost work you may want to change the frequency of the save.
This feature can become a little annoying if you have large workbooks.
You can switch it off completely by clearing the "Save AutoRecover" info check box.
Using AutoSave
AutoSave
SS - top left of application window
Saving in a different Format
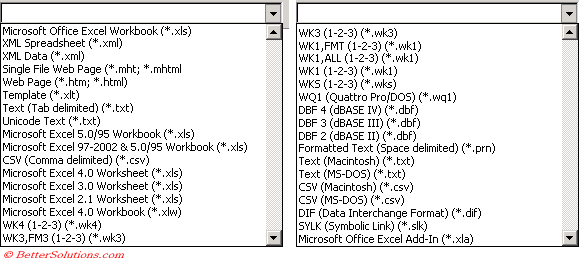
It is possible to save an Excel workbook in a variety of different formats.
To save a workbook in a different file format you can change the save as drop-down box.
 |
Choosing to save the workbook as a web page will allow it to be viewed through a browser.
Displaying the (File > Save As) Dialog Box
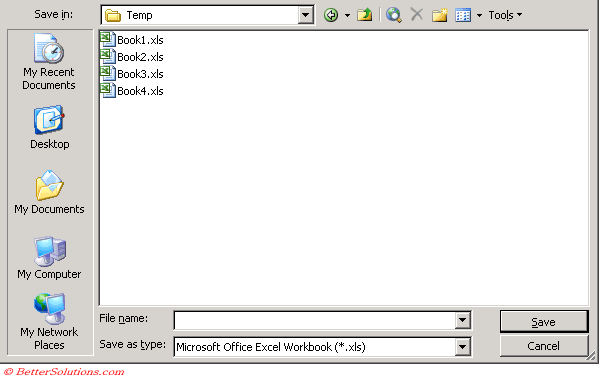 |
Save in - Displays the current folder where the workbook will be saved. To change to a different folder or disk drive, open the Save in drop-down list and select the name of the folder or letter of the disk drive.
File name - The name of the file you want to use to save this workbook
Save as type - Provides a list of all the different formats you can save an Excel workbook as.
Save - Saves a permanent copy of the workbook in the selected folder, using the filename you typed.
Cancel - Closes the dialog box
Back - Displays the contents of the previous file/folder list.
Up One Level - Displays the contents of the folder or drive that holds the currently displayed folder. For example, if you open the My Documents folder on drive C and then click the Up One Level button, you open your username folder (where username is the name you enter to log in to Windows).
Search the Web - Displays a screen that helps you track down a particular Web site.
Delete - Removes the currently selected file or folder and places it in the Windows Recycle Bin.
Create New Folder - Creates a new, empty folder on the currently selected drive or in the currently opened folder. For example, if My Documents is selected, click Create New Folder to make a folder inside the My Documents folder. When you click Create New Folder, the Create New Folder dialog box appears, asking you to type a name for the folder. Type a name that's unique and descriptive but brief and click OK.
View - Displays a list of available ways the Save As dialog box can display the contents of the currently selected disk drive or folder: Thumbnails (small pictures of the first page of each file), Tiles (large icons that represent folders and file types), Icons (small icons that represent folders and file types), List (filenames), Details (filenames, sizes, and dates), Properties (filenames and information), Preview (filenames with a preview of the currently selected file), or Arrange Icons (by name, file type, or date).
Navigation Bar
This is displayed on the left and displays commonly accessed locations:
My Recent Documents -
Desktop -
My Documents
My Computer -
My Network Places - shared drives and folders on your network.
Tools drop-down menu
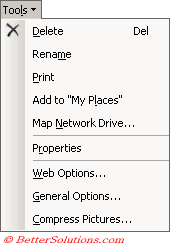 |
Delete - Deletes the file that is currently selected.
Rename - Allows you to rename the file that is currently selected.
Print -
Add to "My Places" -
Map Network Drive -
Properties -
Web Options - Displays the (Tools > Options)(General tab, "Web Options") dialog box.
General Options - See below
Compress Pictures -
General Options
Excel does offer a feature that allows you to automatically saves a copy of your workbook whenever it is saved.
This backup copy is saved in the same folder as the original workbook and can be switched on by selecting the "Always create backup" checkbox in the General Options dialog box.
To backup the previous version of a workbook each time you save, click (File > Save As), click Options and select "Always Create Backup" check box.
An Excel backup file has the extension (*.xlk)
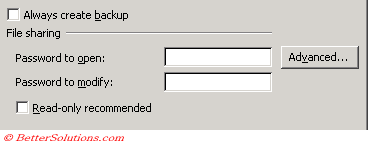 |
Always create backup - This will always save a backup copy each time you save the workbook. This will create a duplicate copy in the same directory and will have the file extension (".xlk").
The rest of these options are identical to those on the (Tools > Options)(Security tab).
Password to open - This password must be provided before the workbook can be opened.
Password to modify - This password must be provided before the original workbook can be saved. Other people can open the workbook and read it but they cannot save any changes without providing the password. They can save the file under a different name as long as the original workbook has not been changed.
Read-only recommended - This can be used to advice users to open the file as read-only. Any workbooks that are opened as read only can only be saved with a different name.
Advanced - Displays a dialog box allowing you to change the type of encryption used.
Important
If you resize this dialog box then the new size will always be displayed.
If you use (File > Save As) to make a backup copy of a workbook any formulas that referred to the original workbook will be changed to refer to the new workbook.
The AutoSave feature can be very useful as well as very annoying. Make sure the "save every "x" minutes is not too frequent.
You can also use the shortcut key (Shift + F12) to save a workbook.
You can also use the shortcut key (Alt + Shift + F2) to save a workbook with a different name.
© 2026 Better Solutions Limited. All Rights Reserved. © 2026 Better Solutions Limited TopPrevNext