Header and Footer Tab
Headers and footers are lines of text that you can print at the top and bottom of every page.
You can include the page number, filename, directory, date and time and even custom text in your headers and footers.
It is possible to repeat rows and columns on every page.
For more details please refer to the Page Setup - Sheet Tab page.
 |
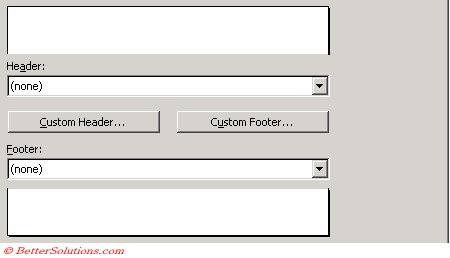
The area at the top and bottom of this dialog box displays a sample of the header and footer you have selected.
This allows you to create a header and/or footer for your worksheet.
Using a Built-In Header or Footer
There are two drop-down list boxes containing some pre-defined headers and footers.
If you are looking at the list of built-in headers or footers you can press the Home key to go to the first entry or the End key to go to the last entry.
| Sample | Code | |
| Page 1 | Page &[Page] | |
| Page 1 of 3 | Page &[Page] of &[Pages] | |
| Worksheet Name | &[Tab] | |
| Workbook Name | &[File] | |
| Folder Path | &[Path] | |
| Current Date | &[Date] |
Creating Custom Headers and Footers
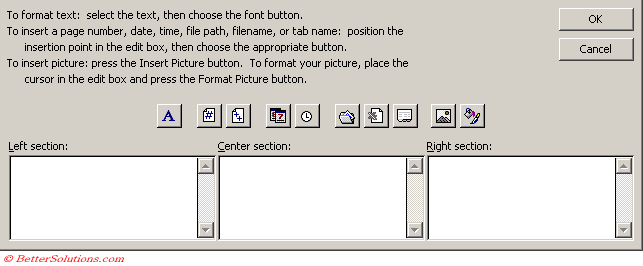
Selecting either the "Custom Header" or "Custom Footer" buttons will display the following dialog box.
This dialog box allows you to create custom headers and footers and looks identical in both cases.
Using this dialog box will let you enter your own text and will also allow you to format it the way you want.
There are three sections and each section can contain various codes to indicate what to display.
The left section is automatically left aligned by default and the right section is right aligned by default.
 |
 | Font - Changes the font, font size, and text style by displaying the (Format > Cells)(Font tab) dialog box. |
 | Page Number - Inserts the current page number. |
 | Total Pages - Inserts the total number of pages on the active worksheet. |
 | Date - Inserts the current date as a field. |
 | Time - Inserts the current time as a field. |
 | Path and File - Inserts the path and file name of the active workbook. |
 | FileName - Inserts the file name of the active workbook. |
 | Sheet Name - Inserts the name of the active worksheet. |
 | Insert Picture - Inserts a picture by displaying the (Insert > Picture > From File) dialog box. If you are replacing an existing picture pressing this button again may not display the browse dialog box. If this happens remove the old &Picture and press OK to close the dialog box. Select the custom header/footer and then press this button. |
 | Format Picture - Allows you to format the picture once it has been inserted by displaying the (Format > Picture) dialog box. |
Adding a Picture
When you have inserted a picture the &[Picture] code is added to the section.
After you have inserted a picture from a file, select the Format Picture button to display the (Format > Picture) dialog box.
This will allow you to specify the exact size, contrast etc and will also allow you to rotate scale and crop the picture.
It is even possible to insert a picture or graphic into your header or footer.
Important
This dialog box can also be displayed by selecting (View > Header and Footer).
You can see how your header or footer actually look like by using the Print Preview feature after you have closed this dialog box.
It is possible to repeat rows and columns on every page. For more details please refer to the Page Setup - Sheet Tab page.
Headers and Footers are only visible when you display your worksheet in Print Preview window.
In Excel 2003 and 2002 you can include images in a header and footer.
Excel will update the page numbers automatically when you add or delete data, or set page breaks.
For a full list of all the Header and Footer codes please refer to the Header and Footer Codes page.
© 2026 Better Solutions Limited. All Rights Reserved. © 2026 Better Solutions Limited TopPrevNext