Code Window
Use the Code window to write, display, and edit Visual Basic code.
This displays the code associated with the item selected in the Project Explorer window.
To display the code select the item in the Project Explorer window and either choose (View > Code) or you can alternatively use the shortcut key (F7).
Also sometimes referred to as a Module window.
You can even just double click the item in the Project Explorer window.
 |
Standard -
Class -
Userform -
You can minimise, maximise, hide and rearrange your code windows.
You can open as many Code windows as you have modules, so you can easily view the code in different forms or modules, and copy and paste between them.
You can open a Code window from:
The Project window, by selecting a form or module, and choosing the View Code button.
A UserForm window, by double-clicking a control or form, choosing Code from the View menu, or pressing F7.
Macros can also be created by typing the commands directly into a code window.
This is often faster than using the macro recorder assuming you are familiar with the corresponding object model.
Code windows can hold four different types of code
1) Subroutines - a set of instructions that performs a particular task
2) Functions - a set of instructions that performs a particular task and then returns a value or an array.
3) Properties - these are used in class modules
4) Declarations - this is used to declare variables that can be used and referenced from anywhere in the module (or project).
A single VBA module can store any number of any of the above and how these are organised is up to you.
Different Views
You can change the views by clicking on the small buttons in the lower-left corner of the code window. Full Module view is the default.
A code module will normally contain more than one procedure or function.
The IDE offers you a choice of whether to display the procedures one at a time (procedure view) or all at one (full module view).
View - Full Module
icon - Full Module View Icon - Displays the entire code in the module.
This is the default.
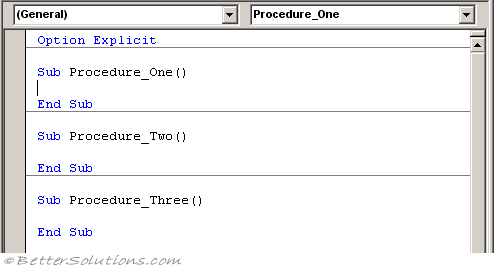 |
horizontal lines separating the procedures and functions.
View - Procedure
This can be controlled from (Tools > Options)(Editor Tab, "Default to Full Module View")
icon - Procedure View Icon - Displays the selected procedure. Only one procedure at a time is displayed in the Code window.
 |
There are multiple levels of Undo and Redo so don't worry if you ever remove the wrong instruction or procedure. You can click the Undo button (Ctrl + "Z") repeatedly.
After undoing, you can press F4 to redo changes that were previously undone.
Force Intellisense
When no listbox is displayed you can press (Ctrl + Spacebar) to complete the input with the given keyword (or variable name).
If there is more than one option then the listbox automatically appears.
Once the listbox has been displayed you can select the desired input with the cursor key
The Tab key completes the selection.
With ESC you can avoid having to select from the listbox and can complete the input manually.
Shortcut Menu
Right mouse click
SS
List Properties/Methods - Opens the intellisense drop-down (Ctrl + J)
List Constants - Lists constants for enum type (appears automatically when needed or Ctrl + Shift + J)
Quick Info - Shows information about a variable or procedure (can be viewed by hovering over a variable while in break mode)
Parameter Info - Shows information about a procedure (appears automatically when typing a function or Ctrl + Shift + I)
Complete Word - Autocompletes current word if it exists or opens intellisense drop-down (Ctrl + Space)
Toggle - Breakpoint - Toggles a breakpoint on the selected line of code
Toggle - Bookmark - Toggles a bookmark on the selected line of code
Object Browser - Opens the Object browser
Add Watch - Adds a watch to the watch window
Definition - Jumps directly to where a procedure or variable is defined (Shift + F2)
Last Position - Jumps to the last position that a change was made in any module (Ctrl + Shift + F2)
Hide - Hides the selected code module
Object List Box
At the top of the code window there are two drop-down boxes.
Displays the name of the selected object. Click the arrow to the right of the list box to display a list of all objects associated with the form.
This can be found at the Top Left of the code window and displays either general objects (userforms or controls) or specific objects (workbooks, documents etc).
Displays all the objects that are associated with the current project.
When an application specific object is selected in the Project Explorer, the Object Box contains two entries General and Declarations
The section called (declarations) is where to place variable declarations for module-level variables that you want available in every procedure within the module.
When a userforms is selected in the Project Explorer the Object list displays all the controls that can be found on that userform.
SS
The other options displays the available object events
All the procedures and functions that are contained within a module are listed in the top right drop-down box.
It is important to remember that this list is alphabetical and is not the order in which they appear.
Since a standard module has no objects the drop-down list in the top left always displays "General"
Procedure List Box
This can be found at the Top Right of the Code window and displays all the procedures and functions (or events if an object is selected) in the active code module.
These are listed in alphabetical order and not the order in which they may appear in the module.
Lists all the events recognized by Visual Basic for a form or control displayed in the Object box. When you select an event, the event procedure associated with that event name is displayed in the Code window.
If (General) is displayed in the Object box, the Procedure box lists any declarations and all of the general procedures that have been created for the form. If you are editing module code, the Procedure box lists all of the general procedures in the module. In either case, the procedure you select in the Procedure box is displayed in the Code window.
All the procedures in a module appear in a single, scrollable list that is sorted alphabetically by name. Selecting a procedure using the drop down list boxes at the top of the Code window moves the cursor to the first line of code in the procedure you select.
Since a code module has no objects, the object listbox in the top left corner always displays (General).
The gray strip on the left of the code window will show any current breakpoints and the position of the current execution line when in break mode.
Clicking in this gray area alongside a line of code will toggle the adding or removing of a breakpoint. A red bullet will appear to indicate a breakpoint.
Margin Bar
A gray area on the left side of the Code window where margin indicators are displayed.
Split Bar
Dragging this bar down, splits the Code window into two horizontal panes, each of which scrolls separately. You can then view different parts of your code at the same time.
The information that appears in the Object box and Procedures/Events box applies to the code in the pane that has the focus.
Dragging the bar to the top or the bottom of the window or double-clicking the bar closes a pane.
It is also possible to split the code window to allow you to look at two sections of the same module at the same time. Pressing F6 toggles between the two windows.
Splits the panes so that you can adjust their size. There are splits between the:
Classes box and the Members of box.
Search Results list and the Classes and Members of boxes.
Classes and Members of boxes and the Details pane.
You can split the Code window horizontally into two panes to view different code segments of a module at the same time. Each pane scrolls separately, both horizontally and vertically.
The Procedure and Object box options refer to the pane that has the focus. Code changes are immediately reflected in both panes.
To split the Code window into panes
Drag the split bar at the top of the vertical scroll bar down from the upper-right corner of the Code window.
To remove a split from the Code window
Double-click the split bar or drag it to the top or bottom of the Code window.
Last Position
Definition
Insert File
(Insert > File)
© 2026 Better Solutions Limited. All Rights Reserved. © 2026 Better Solutions Limited TopPrevNext